

How To Guide
Table of Contents
Additional Patient Functionalities
- Filter Patient List
- Schedule Additional Question Set
- Quick Send
- View Patient Responses
- Edit & Deactivate Patient
- Procedure Question Sets
- Individual Question Sets
- Entity Administrator Account
- Physician Account
- Filters
- Data Output
- Data Export
Create New Entity
** The individual creating an entity will be the administrator for that entity (Entity Administrator = EA).
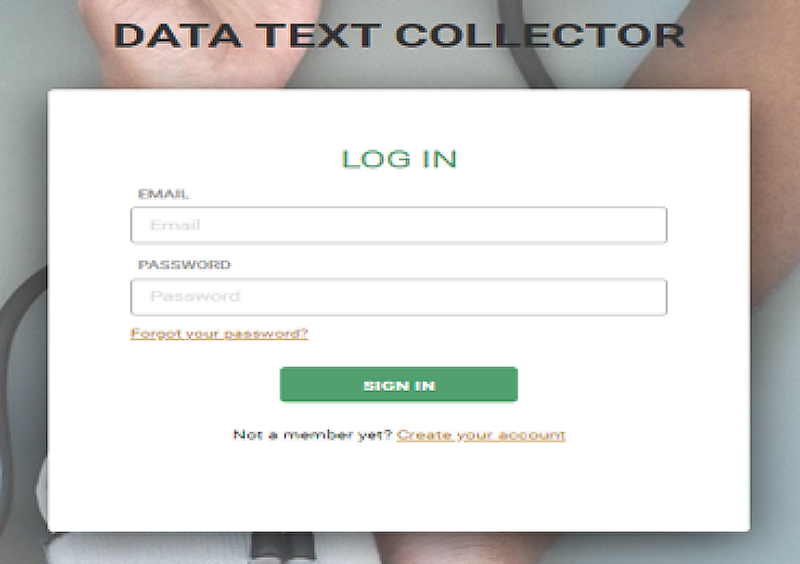
1. Go to the URL dtxmed.com.
2. Under the “SIGN IN” button, click on the “Create your account” link (see below).
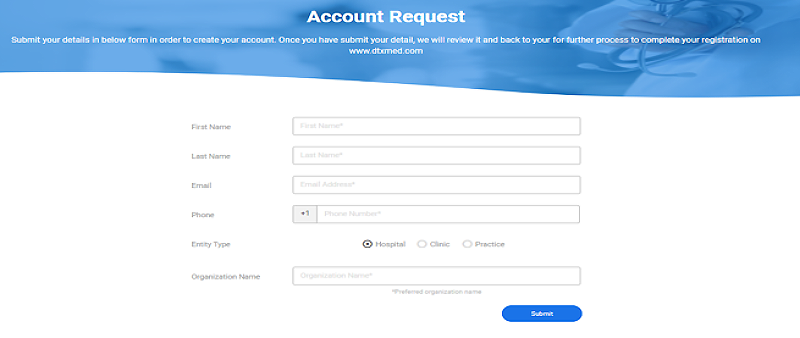
3. You will be redirected to the registration page. Complete all fields and submit (see below).
4. Within 24 hours you will receive an email with your account creation link. Click on the link.
5. Once you click on the link, your account will be confirmed. Within a few minutes you will receive an email with your entity specific URL, username and password to the system.
Create New Provider(User)
** The Entity Administrator (EA) is the default administrator responsible for creating all new users. For more information, please visit the “Special User Rights” section.
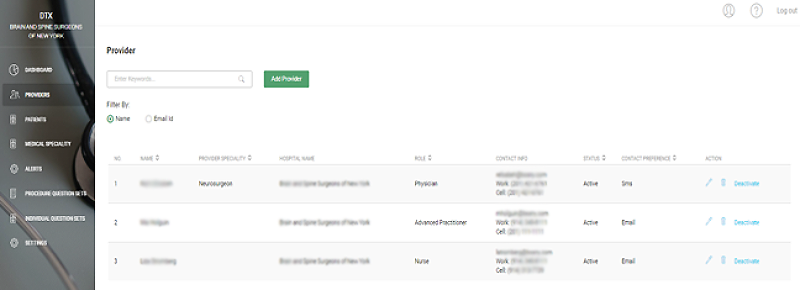
1. Go to the “Providers” tab located on the left-hand side (second tab from the top).
2. Click on the “Add Provider” button at the top of the page (see below).
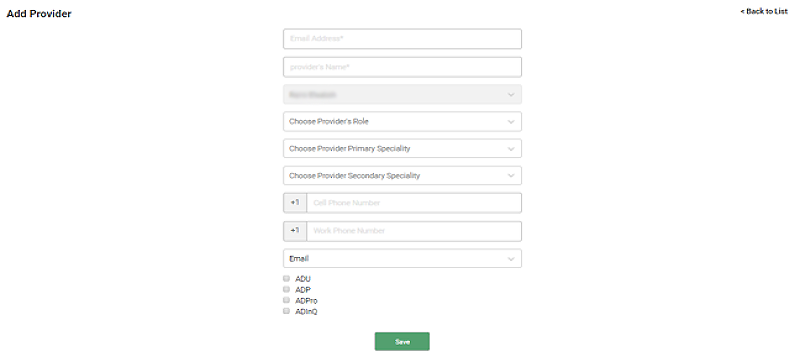
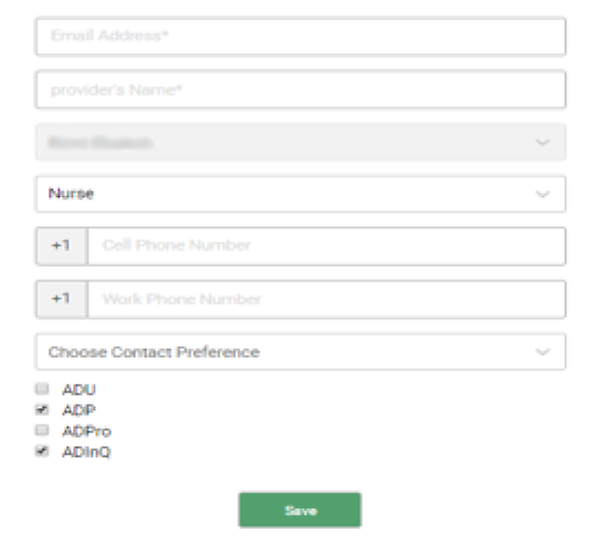
3. Complete all fields.
a. When selecting the provider’s role, you will notice that the privileges at the bottom of the page (ADU, ADP, ADPro, ADInQ) will auto populate based on your specific selection. These privileges auto populate based on the privilege rules the EA has indicated in the “Settings” tab (refer to the “Special User Rights” section for explanations on the privileges and setting up privilege rules). If you are not satisfied with the privileges predefined for the provider you are adding, you can edit the privileges as you wish.
b. When choosing a medical specialty, the available options are specialties which have been added in the “Medical Specialties” tab. Please refer to the “Medical Specialties” section for more information (see below).
4. Save all the information on the “Add Provider” page. You will then be redirected to the main provider page. On this page you can see all the providers added for your entity. The first provider listed will always be the Entity Administrator. You can filter the providers by the various “Filter By:” options located on the top left. After selecting a filter option, enter the key words relevant to the filter option and your search.
5. Within a few minutes the newly added provider will receive an email with an account creation link. The provider must click on this link.
6 After clicking on the link and confirming their account, the provider will receive an email with their username and password for the system.
Add/Schedule Patient
1. Navigate to the “Patient” tab on the left-hand side.
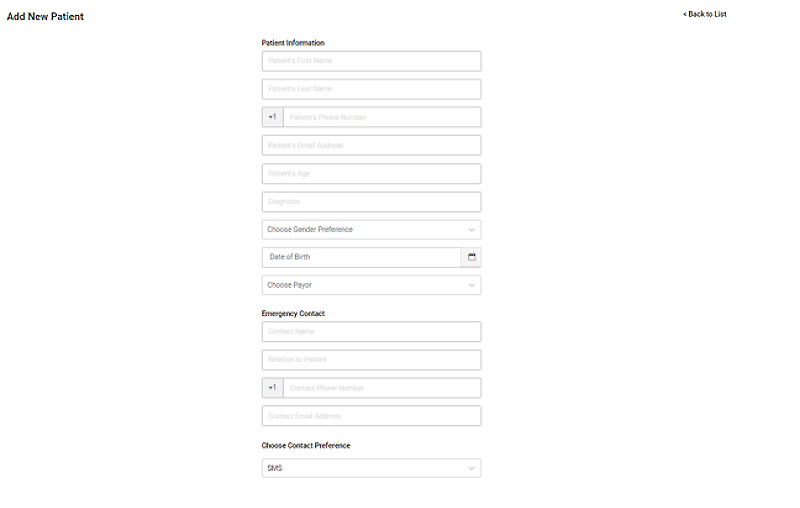
2. Click on the “Add Patient” button on the top of the page (see below).
3. Complete all fields in the “Patient Information” and “Emergency Contact” sections.
4. For the “Choose Contact Preference” section, select the preferred method for the patient to receive question sets (see below).
5. In the “Physician” section, choose the physician performing the surgery (if selecting a Procedure Question Set) or the most recent physician assigned to the patient (if selecting Individual Question Set).
6. Next indicate whether you would like to send the question set to a patient (Patient) or his/her physician (Quality).
7. Select the type of question set you would like to schedule for the patient (see below).
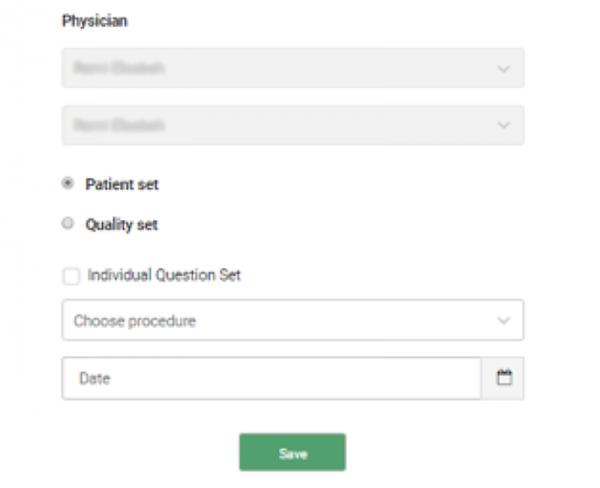
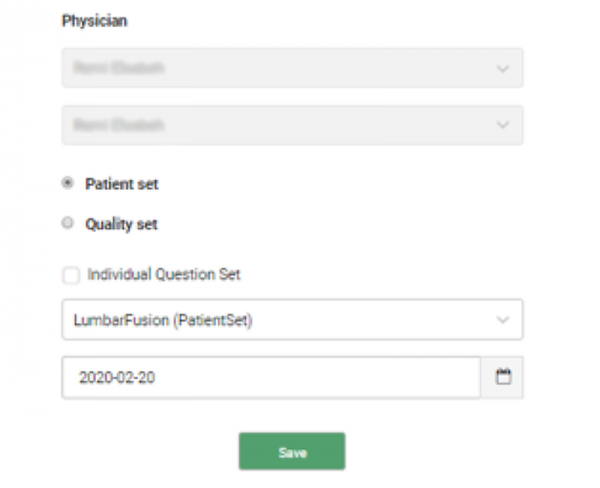
7. a. If scheduling a procedure question set, select a procedure from the “Choose procedure” dropdown, then indicate the date of the procedure. The question set will be sent according to the parameters established when the question set was created.
-
- For example, let’s assume a Lumbar Fusion Procedure was created in the “Procedure Question Sets” tab with an associated preop question set scheduled to be sent 2 days before surgery, and an associated postop question set scheduled to be sent 7 days after surgery. As seen in the below example, if you schedule a patient to receive this procedure on 2/20/20, they will receive the preop question set 2 days before the date of surgery (2/18/20) and the postop question set 7 days after the date of surgery (2/27/20).
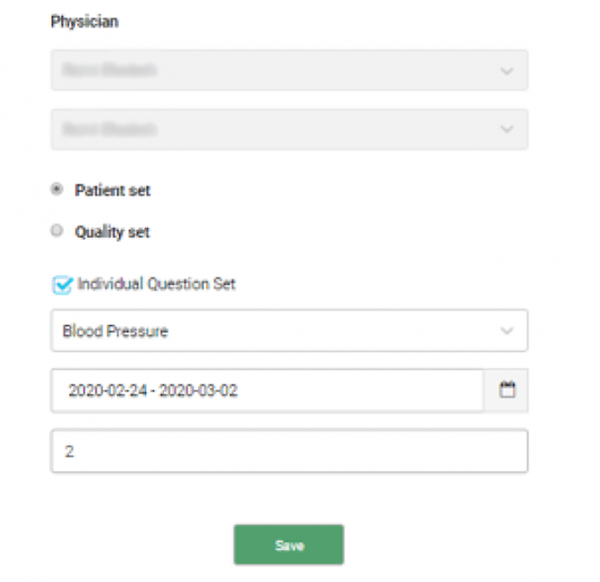
7. b. If scheduling an individual question set, select the “Individual Question Set” checkbox. Once selected, you will be prompted to choose the specific individual question set you would like to schedule from a dropdown list. Next, select the date range for which you would like the question set to be sent. The Start Date represents the first day the question set will be sent, and the End Date represents that last day the question set could possible be sent. After selecting a date range, type in the Frequency. This represents how many days you want the question set to be sent within the date range you selected. The values are: 1 = every day, 2= every other day, 3 = every 3 days etc.
-
- As an example, let’s assume you created the Blood Pressure Individual Question Set and that you would like to monitor a prehypertensive patient’s blood pressure over 7 days. After selecting the Blood Pressure Question Set, you would select the start date and end date for the 7 days. The Start Date is Day 1 and the End Date is Day 7. You would then select the frequency, or how often you would like the question set to be sent, between Day 1 and Day 7.
- If you input “1” for the frequency, the question set will be sent to the patient every day from Day 1 to Day 7 (Day 1, Day 2, Day 3 etc.). If you input 2 for the frequency, the question set will be sent every 2 days, so Day 1, Day 3, Day 5 and Day 7. If you input 3 for the frequency, the question set will be sent every 3 days, so Day 1, Day 4 and Day 7. Higher values for the frequency follow the same pattern. In the below example, the patient will receive the question set on 2/24, 2/26, 2/28 and 3/1.
- As an example, let’s assume you created the Blood Pressure Individual Question Set and that you would like to monitor a prehypertensive patient’s blood pressure over 7 days. After selecting the Blood Pressure Question Set, you would select the start date and end date for the 7 days. The Start Date is Day 1 and the End Date is Day 7. You would then select the frequency, or how often you would like the question set to be sent, between Day 1 and Day 7.
8. Save all information.
Additional Patient Functionalities
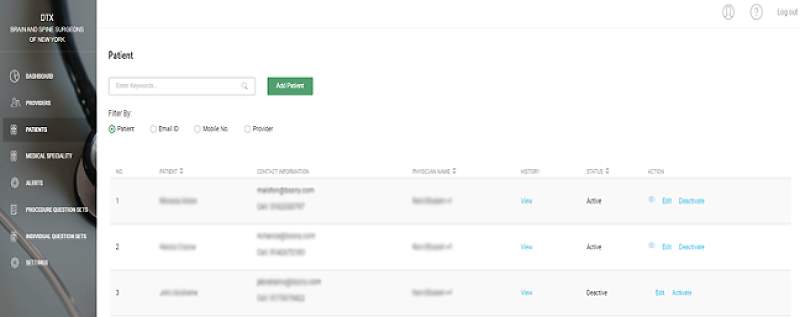
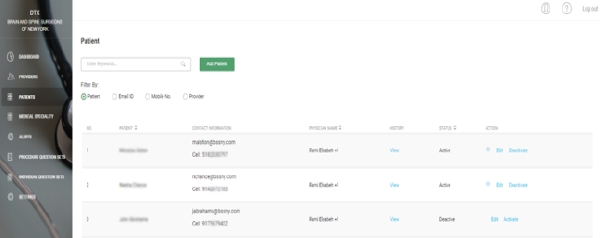
After scheduling a question set and saving the information, you will be redirected to the main Patient page. On this main page you can do the following:
1. View a list of all the patients who have ever been added to your entity. You can filter the patients by the various “Filter By:” options located on the top left. After selecting a filter option, enter the key words relevant to the filter option and your search.
2. Schedule an additional question set.
a. On the main Patient page, navigate to the “Action” column (the right-most column) and click on the “View” button (eye icon).
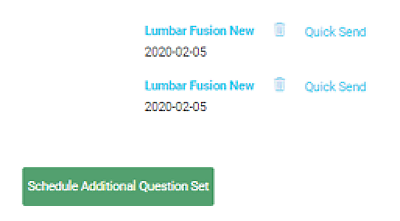
b. Select the “Schedule Additional Question Set” button on the bottom of the page.
c. Follow the same process for scheduling an initial patient set for the patient.
3. Quick Send – Quick sending a question set allows a patient to receive the question set immediately via their preferred contact preference.
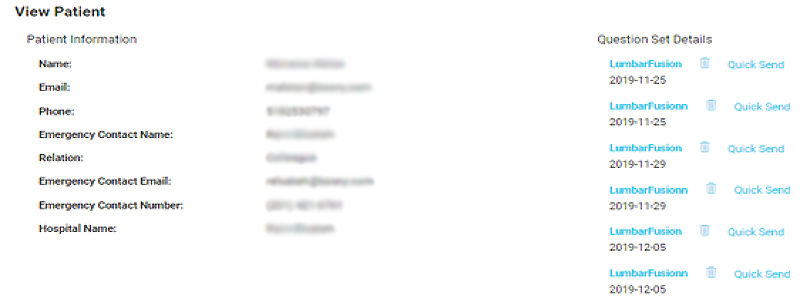
a. On the main Patient page, navigate to the “Action” column (the right-most column) and click on the “View” button (eye symbol).
b. On this page you will be able to see all the question sets that have been scheduled for the patient or their physician under the “Question Set Details” column in the middle of the page.
c. To quick send a question set, select the “Quick Send” button to the right of the respective question set.
Note: If the “Delete” button (trash can symbol) is selected for an upcoming question set, the patient will not receive this question set and it would need to be rescheduled. If an old question set (patient has already received and answered) is deleted, this action will delete the record from this page. However, deleting an old question set will have no effect on viewing the individual patients’ responses or dashboard data for that question set.
4. View Patient Responses.
a. To do this, on the main Patient page, click on the “View” button under the “History” column (3rd column from the right) for a patient. You will be directed to the Patient History page.
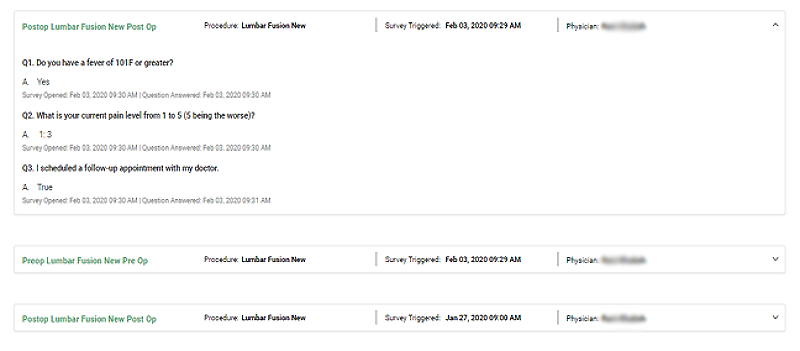
b. On this page you can view the responses for each question set scheduled for that patient. The question sets are organized by the original survey triggered date, or when the question set was originally sent to the patient.
c. Each row on the page represents a question set. To view responses, click on a specific row. Here you will be able to see the questions and answers for the question set, when each question was opened, when each question was answered, and any follow-up notifications that the patient received.
5. Edit a patient’s information. To do this, navigate to the “Action” column (the right-most column) on the main Patient page and select “Edit” for the patient in question.
6. Deactivate a patient. This can be done by selecting the “Deactivate” button under the “Action” column on the right-hand side. A patient can be activated again at any time. To activate a patient, follow the same process. A deactivated patient cannot be:
a. Scheduled for a new question set.
b. Quick sent a question set.
c. Receive an upcoming question set that has been scheduled.
Add Question Set
Procedure Question Sets
Procedure question sets are sets that are linked to a procedure. These questions will be sent to patients according to the procedure date (which you will indicate when adding a patient) and the parameters set forth in steps 7 and 8 below.
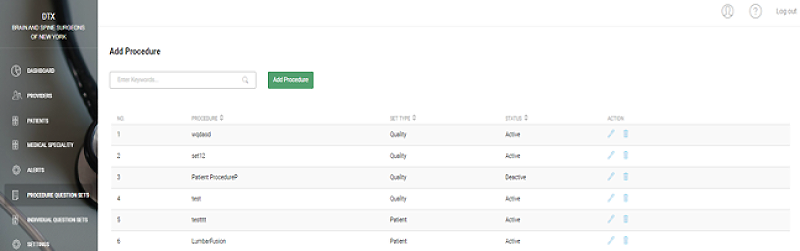
1. To add a procedure question set, navigate to the “Procedure Question Sets” tab on the left-hand side.
2. Click on the “Add Procedure” button on the top of the page.
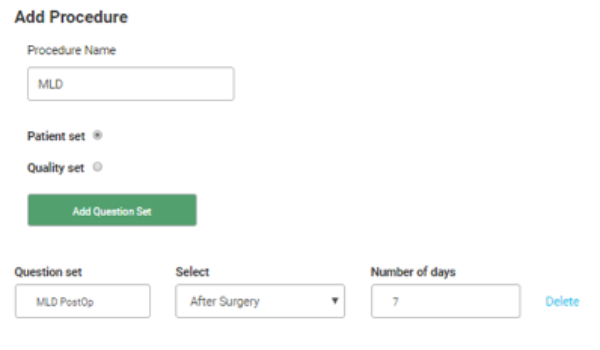
3. Input the name of the procedure for which you are creating a question set.
4. Select whether you want the question set to be sent to the patient (Patient) or physician (Quality).
5. Click on the “Add Question Set” button.
6. In the “Question set” field, enter the name of the question set you are creating.
7. In the “Select” field you will indicate if you want the question set to be sent before or after the procedure.
8. In the “Number of days” field, enter the number of days before or after the procedure (depending on your selection in Step 7) that you want to the question set to be sent to the patient (see below).
9. Click on the “Save Procedure” button on the bottom right of the page.
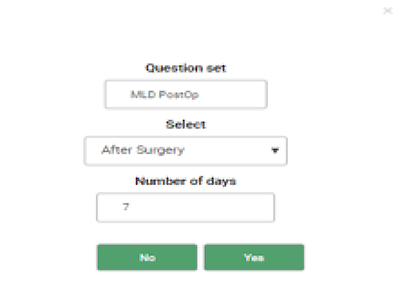
10. The question set you just created will be under the “Question Sets” column. To edit any of the information from steps 6-8, select the “Edit” button. A pop-up window will appear allowing you to edit (see below).
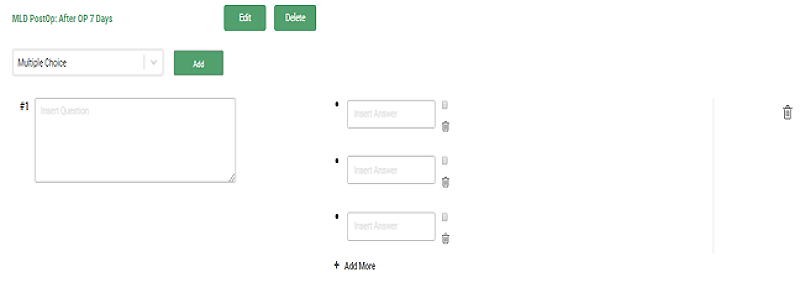
11. To begin adding questions, click on the question set and select the question type from the drop-down list. There are three question types: Yes/No, True/False and Multiple Choice. Once you have chosen a question type, click on the “Add” button on the right.
12. You can now add your first question. In the “Insert Question” field, type in your question. If a Multiple-Choice question type was chosen, enter the answer choices in the “Insert Answer” fields.
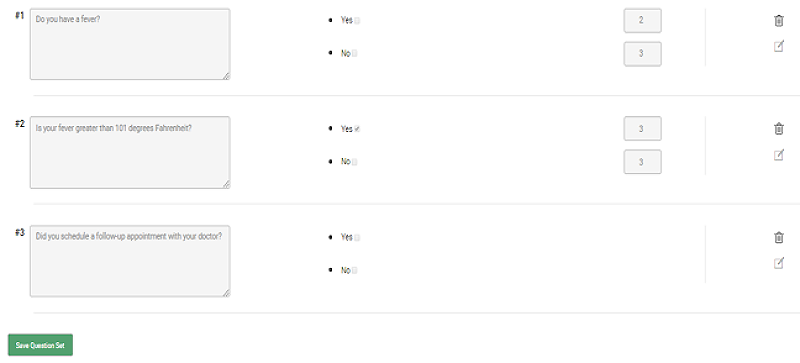
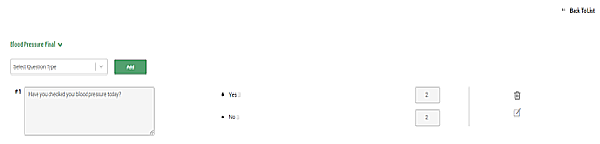
13. If more than 1 question is added, you have the ability to map questions. You will notice that to the right of each of the answer choices is a number. This number represents a question number. Once the patient selects an answer choice, the next question they will receive will depend on this number. If the patient selects an answer and the number next to the answer is 2, the patient will then be asked the second question. If the number is 3, the patient will not be asked the second question and will instead be asked the third question. As seen in the below example, if the patient answers “Yes” to Question 1, they will be directed to Question 2. However, if the patient answers “No” to Question 1, they will be directed to Question 3.
14. For patient question sets, there are checkboxes next to each of the answer choices for any question type chosen. These checkboxes allow you the opportunity to track specific outcomes in real time. If a checkbox for a specific answer is selected, this answer will be considered an Alert. In the below example, if the patient answers “Yes” to the question “Is your fever greater than 101 degrees Fahrenheit”, this response would constitute an Alert.
14. a. If a patient selects the checked response, the physician will be alerted via email immediately (see below).
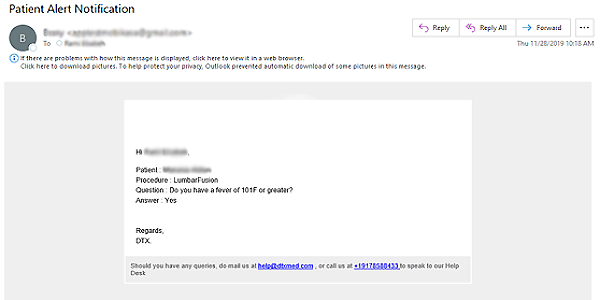
14. b. The physician can also receive an alert notification through text (see below).

15. After adding all your questions, please select the “Save Question Set” button on the bottom left-hand side.
16. Your question set has now been saved. At this time you may:
a. Add an additional question set for the procedure. To do this repeat step 5.
b. Edit the existing question set. To do so, repeat step 10. To delete the question set, select the “Delete” button on the right of the question set name.
c. To edit a specific question, click on the name of the question set. To the far right of each question you will notice an “Edit” button (pen writing symbol) and “Delete” (trashcan symbol) button (see below).

16. d. Return to the main Procedure Question Set page. To do so, select the “Back to List” button in the top right.
17. On the main Procedure Question Set page you can view all the procedure question sets that have been added. To edit a question set within a procedure, navigate to the “Action” column on the right-hand side and click on the “Edit” button (pen symbol). To delete a procedure, select the “Delete” button (trashcan symbol) under the “Action” column.
Individual Question Sets
Individual question sets are sets that are not linked to a procedure or care event. These are standalone question sets and can be used for diagnostic, chronic disease management, patient satisfaction and other purposes.
1. To add an individual question set, navigate to the “Individual Question Sets” tab on the left-hand side.
2. Click on the “Add Question Set” button on the top of the page (see below).
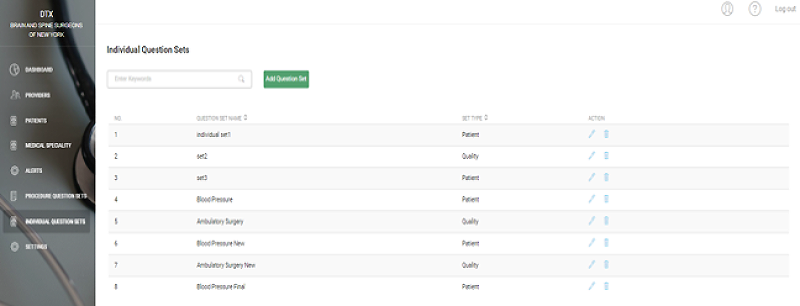
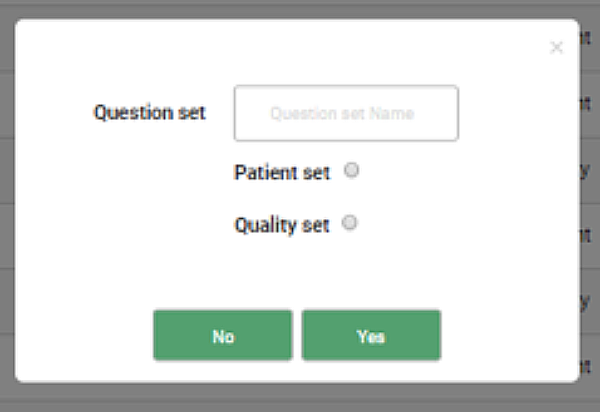
3. A pop-up box will appear. Input the name of the question set and select whether you want the question set to be sent to the patient (Patient) or physician (Quality). Select the button “Yes” at the bottom of the pop-up (see below).
8. On the main Individual Question Set page you can view all the individual question sets that have been added. To edit a question set within a procedure, navigate to the “Action” column on the right-hand side and click on the “Edit” button (pen symbol). To delete a procedure, select the “Delete” button (trashcan symbol) under the “Action” column.
4. The pop-up will disappear. Find your question set under the “Question Set Name” column. The most recent question sets added will appear at the bottom of the list. Once you have found your question set and click on the “Edit” button (pen symbol) on the right-hand side under the “Action” column.
5. You can now begin adding questions. For details on how to add questions, steps 11-15 in the previous section.
6. After adding all your questions, please select the “Save Question Set” button on the bottom left-hand side.
7. Your question set has now been saved. At this time you may:
a. Edit the existing question set. To edit a specific question, click on the name of the question set. To the far right of each question you will notice an “Edit” button (pen writing symbol) and “Delete” (trashcan symbol) button.
b. Return to the main page. To do this, select the “Back to List” button on the top right (see below).
Medical Specialties
Medical specialties represent the various specialties of the physicians in your entity.
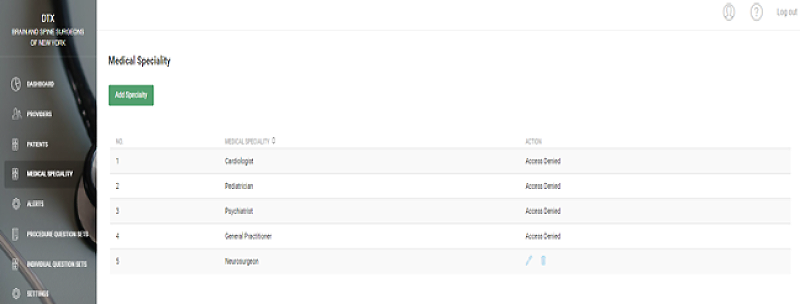
1. To add a medical specialty, navigate to the “Medical Specialty” tab on the left-hand side.
2. Click on “Add Specialty” on the top of the page (see below).
3. Enter the specialty and select “Save”.
Alert Dashboard
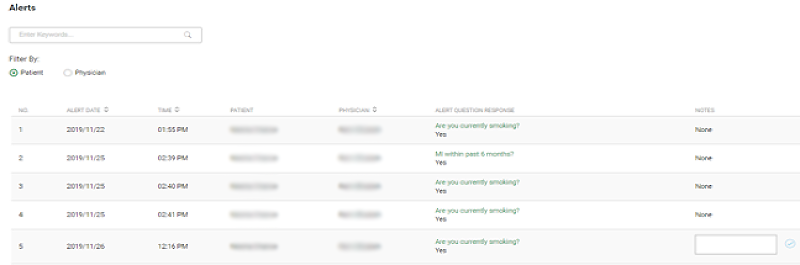
All alerts are housed in the Alerts Dashboard. This dashboard exists to allow users to keep track of and manage alerts.
1. To view alerts in the Alerts Dashboard, go to the “Alerts” tab on the left-hand side.
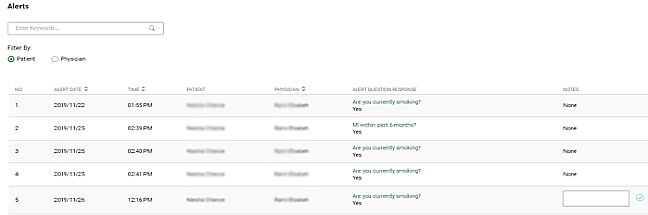
2. Here you will see all the alerts that have ever been triggered, organized by oldest to most recent. Each row represents an alert, and for each alert you will notice information on the alert date, time, patient, physician, question and response.
3. To the far right of each alert is a “Notes” column.
a. The textbox in this column allows the user to document any comments pertaining to the alert. A comment must be inputted for every alert.
b. The checkmark to the right of this textbox allows the user to save the alert, making it a record in the dashboard. The checkmark can only be selected once an alert is acknowledged and commented on.
4. Alerts can be filtered by “Patient” or “Physician”. To filter the alert, select a “Filter By” option at the top of the page and type in any key words related to your search (see below).
Special User Rights
The Entity Administrator (EA) account and all Physician accounts have certain unique privileges. These privileges are listed below.
EA Account
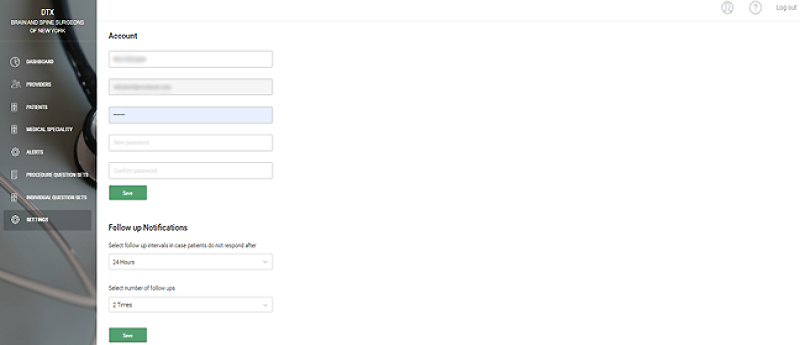
1. Set up follow-up notifications. Follow-up notifications allow you to automatically re-send questions sets to patients who have not responded to the originally scheduled question sets. The steps for setting up follow-up notifications are as follows:
a. Navigate to the “Settings” tab on the left-hand side and go to the “Follow up Notifications” section.
b. In the first drop-down list, select the follow-up interval. This interval indicates when you would like the patient to be resent the question set. In the below example, if you select “24 Hours” this would indicate that, if the patient does not answer the originally scheduled question set, it will be resent to the patient 24 hours later.
c. In the second drop down list, select the number of times you would like the patient to be resent the question set. In the below example, if you select “2” the patient will be resent the question set a maximum of two times. So, if you select “24 Hours” in the first drop-down and “2” in the second dropdown, this would indicate that if the patient does not respond to the originally scheduled question set, they will be resent the question set 24 hours later. If they do not answer the resent question set, they will be resent the question again 24 hours later.
d. Save your selections by selecting the “Save” button.
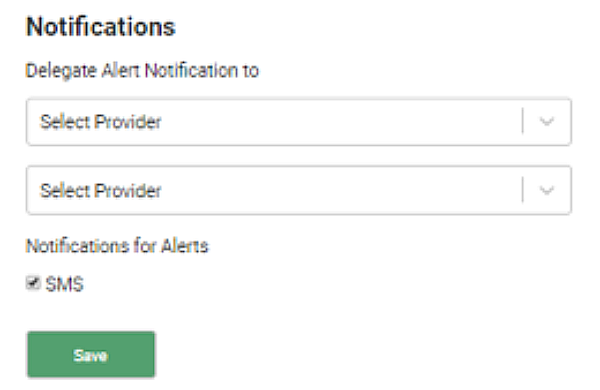
2. Set up SMS notifications. The EA receives alert emails for all alerts triggered. SMS notifications for alerts do not contain any PHI and simply notify the user that an alert email has been sent. If you would like to receive SMS alert notifications, please do the following:
a. Navigate to the “Settings” tab on the left-hand side and go to the “Notifications” section.
b. Under the “Notifications for Alerts” subheading, select the checkbox next to the word “SMS” (see below).
3. Determine default user privileges. User privileges are defined as the level of access each type of user can have. There are five types of users: EA, Physician, Nurse, Assistant and Other. Each of these user types are already associated with their own level of access, or privileges. There are four separate privileges which include: add/delete user, add/delete patient, add/delete procedure question set, and add/delete individual question set. To view or change these default privileges please do the following:
a. Navigate to the “Settings” tab on the left-hand side and go to the privilege table at the bottom of the screen.
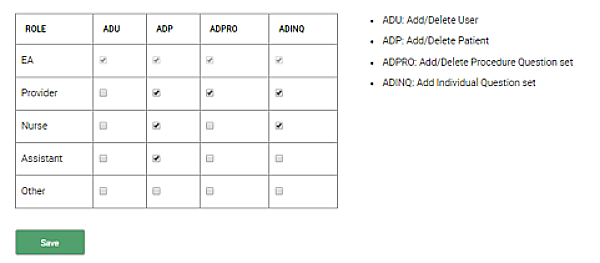
3. b. Here you will see the default privileges automatically assigned to each user type. Listed below is an explanation of these privileges:
-
- ADU = Add/Delete User. This privilege allows the user to add/delete a provider in the “Providers” tab. The user will also be able to filter the Providers on the main Provider page.
- ADP = Add/Delete Patient. This privilege allows the user to add/delete a patient and send the patient a question set (either through the scheduling or quick send functionalities). The user can also view the patient’s responses, deactivate the patient, or filter the patients on the main Patient page
- ADPRO = Add/Delete Procedure Question Set. This privilege allows the user to add/delete procedure question sets in the “Procedure Question Sets” tab on the left-hand side.
- ADINQ = Add/Delete Individual Question Set. This privilege allows the user to add/delete individual question sets in the “Individual Question Sets” tab on the left-hand side.
c. To change a default privilege for a user type, check/uncheck the relevant checkbox in the table. Listed below are key points to keep in mind:
-
- All users (except for EA) can only delete information that has been added by that specific user. For example, if a specific user has the “ADP” privilege, they can only delete patients that they have added. The EA can add/delete any information, even that which has not been added specifically by the EA.
- When a specific user is being added to your entity, the privileges automatically assigned to the user will be in accordance with the privileges outlined in this table. However, you have the option to customize the privileges for each user added. For example, let’s assume that we are adding a nurse to the system. You will notice in the below screenshot that the “ADP” and “ADINQ” privileges auto populate as these are the privileges outlined for the nurse user type in the default privilege table. If I want the nurse I am adding to be able to also add other users to the system, I can assign her this privilege by simply checking the “ADU” checkbox at the bottom of the page.
-
- A user with the ADPRO and ADINQ privileges can only CREATE question sets and cannot schedule a patient for the question set unless the user is also given the ADP privilege.
Physician Account
1. Delegate Alert Emails. The Physician receives alert emails for all alerts triggered by his patients. The Physician can assign two other providers to also receive alert emails. To do so:
a. Navigate to the “Settings” tab on the left-hand side and go to the “Notifications” section.
b. Under the “Delegate Alert Notification to” subheading, select up to two providers to receive alert emails.
2. Set up SMS notifications. To do this, refer to step 2 in the previous section.
Analytics Dashboard
The analytics dashboard allows you to view, and filter by select variables, the aggregate patient data for any question set you have created in real time. You can export the results to Excel to view the individual patient data. A maximum of 5 question sets can be displayed on the dashboard page at any given time. Both Patient and Quality sets can be displayed simultaneously. Please find below instructions on how to use the dashboard.
1. Navigate to the “Dashboard” tab on the left-hand side.
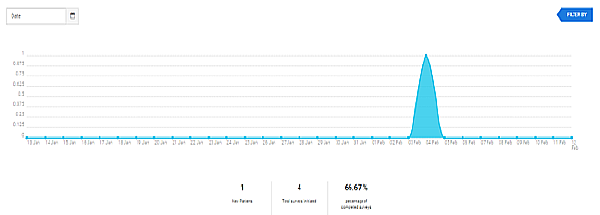
2. You will notice three numbers displayed on the page. These numbers represent the number of new patients enrolled, the total number of surveys sent (initiated), and the response rate (percentage of surveys completed) for your entire dataset (see below).
Filters
3. To view the aggregate responses for specific question sets, do the following:
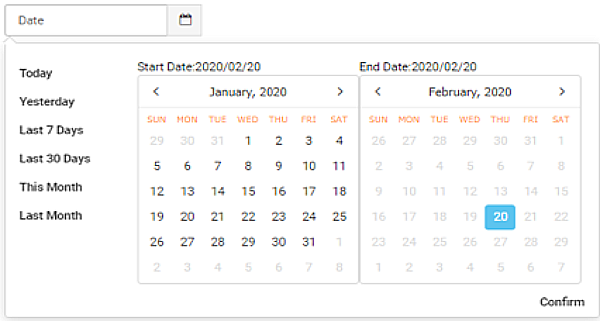
a. On the top left of the page is the “Date” filter. Click this filter and select the start and end date for the data you are interested in. You can also select one of the presets (“Today”, “Yesterday” etc.) on the left-hand side of the filter. If you are not interested in a specific date range, you can leave this filter blank (see below).
3. b. Select the “Filter By” filter on the top right-hand side.
c. Choose one question category. “Procedure Question Types” correspond to procedure question sets, and “Individual Question Types” correspond to individual question sets. Only one question category can be viewed at once. In the below example we chose the “Procedure Question Types”.
d. Choose a question type. You can search for data from “Patient Sets”, “Quality Sets” or both. If you would like to view data from both, select “All” from the dropdown as we have done in the below example.

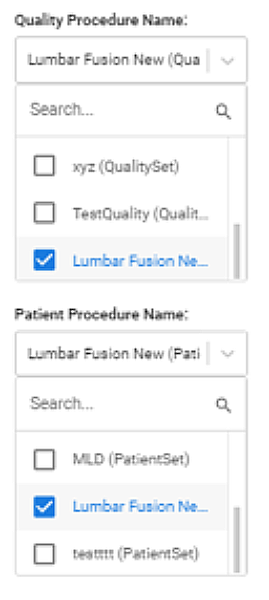
3. e. Once we select “All”, two more filters will appear: “Quality Procedure Name” and “Patient Procedure Name”. Choose the quality and patient procedures you are interested in. You may also search for a specific procedure by entering the procedure’s name into the “Search” field. In the below example we chose one quality procedure and one patient procedure.
3. f. After selecting the appropriate patient and quality procedures, two more filters will appear: “Quality Question set” and “Patient Question set”. Select the appropriate question sets. You can search for a specific question set by entering the question set’s name into the “Search” field. When making your question set selections, please know the following:
-
- Up to 5 question sets can be displayed at any given time. For example, if one quality question set is chosen, a maximum of 4 patient question sets can be selected. In the below example, we have chosen one quality question set and two patient question sets.
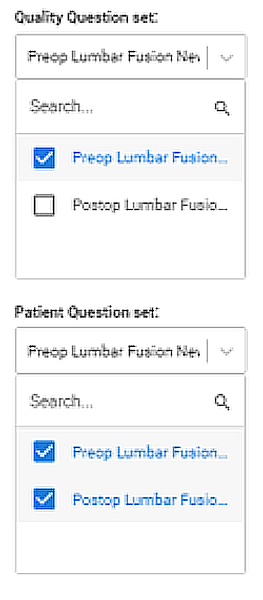
-
- You must select ONLY ONE quality question set if you would like to have the ability of stratifying the patient question set data by the quality question set data. In other words, when looking at the final dashboard output, if only one quality question set is chosen, you will be able to filter the responses from the patient question sets by the responses from the one quality question set that you chose. If more than one quality question set is chosen, the data from these question sets will appear in the dashboard output (as long as the number of questions sets does not exceed 5), but you will not be able to stratify the patient question set responses (see step i below).
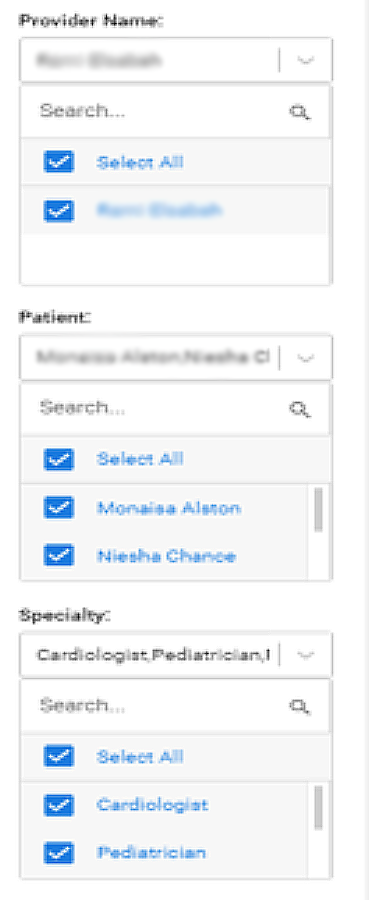
3. g. Once you have chosen the question sets, you have the option of filtering by Provider, Patient and Specialty. If you would like to view ALL data for the specific question sets you have chosen, select “Select All” for the “Provider Name”, “Patient” and “Specialty” filters (see below).
Output
a. After you have finalized all your selections, click on the “Submit” button. You will now see the aggregate data displayed in a similar manner to the below image. For the aggregate data, you will notice three question sets displayed. These are the questions sets that we selected in step f above. Under each question set are the constituent questions. Under each question are the answer choices alongside the % of patients who selected those responses. Quality question sets will always be displayed before (to the left of) patient question sets. We chose to display one quality question set, “Preop Lumbar Fusion New”, which is the leftmost question set displayed here. For the quality question sets, you will notice that there is a textbox next to each of the answer choices for the individual questions. As described in section f, you can stratify the patient question set data (middle and rightmost question sets) by the quality question set responses.
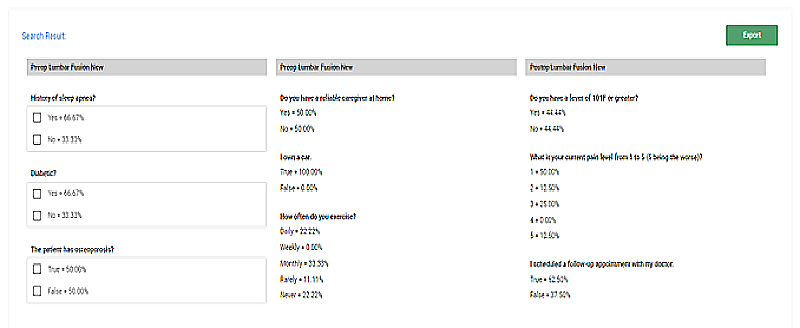
b. In order to stratify the patient data, click on one of the textboxes. For example, as seen below, if we are interested in viewing the data for all patients with sleep apnea, we would select “Yes” for the question “History of Sleep Apnea” for the quality question set. Observe how the patient data (middle and right-most columns) changes. Remember quality question sets are sent to the physician. So, in this example, physicians received a question set asking them if their patient had sleep apnea. The below output is showing the data for patients 1) who answered the patient question sets selected AND 2) whose physicians indicated that they had sleep apnea on the quality question set.
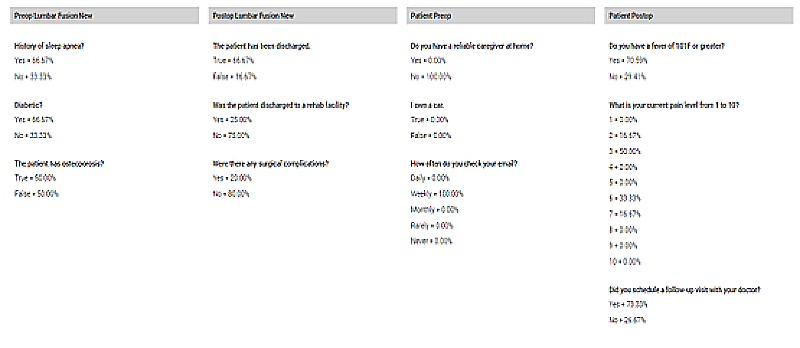
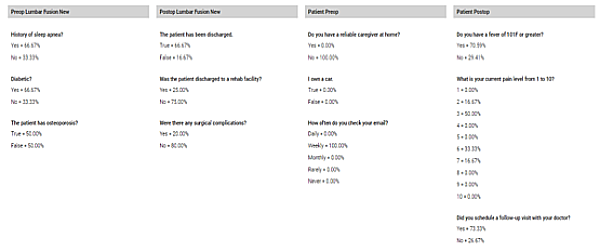
c. The patient data can only be filtered by the quality data if ONLY ONE quality question set is chosen. If more than one quality question set is chosen, this filtering cannot be done. In the below example, two quality question sets and two patient question sets are displayed. “Preop Lumbar Fusion New” and “Postop Lumbar Fusion New” are the quality question sets. As can be seen, since two quality question sets were chosen, you cannot stratify the patient data by the quality data.
d. Along with the data output reviewed in steps i-j, the dashboard will also show the total number of questions sent and answered for the question sets selected to be displayed. Also, in addition to stratifying the patient data by the quality data, you can filter all data (patient and quality) by several subfilters. These subfilters are gender, age, payor and diagnosis (see below).

Export
a. If you would like to view the patient-level data, you can export the data to Microsoft Excel by selecting “Export” on the right-hand side on the main dashboard output page (see image below step a in the section Output). In Excel, each tab represents a question set. In the below example, the question set “Preop Lumbar Fusion New” is one tab.
b. The data for the “Preop Lumbar Fusion New” question set can be seen below. Each row represents data for a patient who has answered the survey completely. Rows are organized by Date of Service (DOS). A patient can populate more than one row since question sets can be answered by the patient (or by the physician for quality sets) more than once (see the below example). The columns represent the different variables which include the following patient and physician factors: DOS, Patient Name, Age, Gender, Payor, Physician, Specialty, and Diagnosis. The columns also include when the question set was triggered (“Quality Set Triggered”), the response to every question of the question set (“History of sleep apnea” etc.) and the date and time of each question response (“Answer Date 1”, “Answer Date 2” etc.).
